
Wilderness Leadership - Advanced: Respuestas
1. Tener las siguientes especialidades:
1a. Plantas silvestres comestibles
Para consejos e instrucciones, véase Plantas silvestres comestibles.
1b. Liderazgo al aire libre
Para consejos e instrucciones, véase Liderazgo al aire libre.
1c. Liderazgo en la naturaleza
Para consejos e instrucciones, véase Liderazgo en la naturaleza.
1d. Vida primitiva
Para consejos e instrucciones, véase Vida primitiva.
2. Conocer y practicar los principios de camuflaje y seguimiento de pistas.
Para acercarse a un animal, los rastreadores deben permanecerse sin detectar no sólo por el animal, sino también por otros animales que pueden alertarlo. Moviéndose lo más silencioso posible, rastreadores evitan pisando hojas secas y ramas, y tienen mucho cuidado cuando se mueven a través de la hierba seca.
Si los rastreadores están cerca del animal, es importante que permanezcan a favor del viento, es decir, en una posición donde el viento sople lejos de el animal en la dirección del seguidor. Ellos nunca deben estar en una posición en la que su olor podría ser llevada por el viento hacia el animal y alertarlo. También es importante que el animal no tenga la oportunidad de cruzar sus huellas, ya que el olor humano estará en ellas. La mayoría de los animales prefieren mantener el viento en sus rostros cuando viajan para que puedan oler el peligro por delante de ellos. Los rastreadores tendrán que estar a favor del viento cuando se acercan a los animales desde atrás. Sin embargo, la dirección del viento puede cambiar. Si la dirección del viento no es favorable, los rastreadores tal vez tengan que dejar las huellas para buscar su presa desde el lado a favor del viento.
Mientras los rastreadores se acercan al animal, deben asegurarse de que ellos lo ven antes de que el animal los vea. Algunos rastreadores creen que un animal sigue mirando para abajo a su propio camino, siempre en estado de alerta por el peligro que viene de atrás. Cuando el rastro esrá muy fresco, puede ser que los rastreadores tengan que dejar el rastro para que el animal no los vea primero. Animales usualmente descansan frente a la dirección del viento, de modo que puedan ver el peligro que se acerca desde el lado a favor del viento, mientras que puedan oler el peligro que viene de detrás de ellos. Un animal también puede volver sobre sus pasos y circular a favor del viento antes de sentarse para descansar. Un depredador tras su rastro pasará el animal que descansa sobre el lado a barlovento antes de darse cuenta de que el animal volvió sobre sus pasos, y el animal descansando olerá el depredador a tiempo para hacer su escape.
Al acecho de un animal, rastreadores utilizan la cubierta de arbustos, bajando en sus manos y rodillas cuando necesario. En hierba larga, bajan a sus estómagos jalándose ellos mismos adelante con sus codos. Lo más importante es no llamar la atención con movimientos bruscos. Rastreadores toman su tiempo, moviéndose lentamente cuando el animal no está mirando, y el manteniéndose quieto cuando el animal está mirando a su dirección. Al acecho de un animal, los rastreadores también tienen cuidado de no molestar a los demás animales. Un animal perturbado dará su señal de alarma, alertando así a todos los animales en los alrededores, incluyendo el animal que está siendo rastreado.
3. ¿Qué preparativos físicos y mentales son necesarios antes de una experiencia en lugares desiertos?
4. Demostrar algunas habilidades necesarias para el liderazgo en la naturaleza en dos de las siguientes áreas que no se hayan completado para la especialidad de Liderazgo en la naturaleza:
4a. Tropical
Consideraciones inmediatas
Protéjase de la lluvia tropical, el sol y los insectos. Los mosquitos portadores de la malaria y otros insectos son peligros inmediatos, así que protéjase contra las picaduras.
En los trópicos, aun el rasguño más pequeño puede infectarse peligrosamente rápidamente. Trate rápidamente cualquier herida, sin importar cuán pequeña sea.
Obtener agua
De los árboles de guineo o plátano
- dondequiera que encuentre árboles de guineo o plátano, puede obtener agua. Corte el árbol, dejando un tocón de unos 30 centímetros y saque el centro del tocón para que el hueco tenga forma de cuenco. El agua de las raíces comenzará inmediatamente a llenar el hueco. Los primeros tres rellenos de agua serán amargos, pero los siguientes rellenos serán agradables. El tocón proporcionará agua hasta por cuatro días. Asegúrese de cubrirlo para mantener alejados a los insectos.
De bambú
- los matorrales de bambú verde son una excelente fuente de agua dulce. El agua del bambú verde es transparente e inodoro. Para obtener el agua, doble un tallo de bambú verde, átelo y corte la parte superior. El agua goteará libremente durante la noche. Coloque un recipiente directamente debajo de la parte superior cortada para recoger el agua a medida que gotea. El bambú viejo y agrietado puede contener agua.
De arroyos y lagos
- a menudo se puede obtener agua casi clara de arroyos o lagos fangosos cavando un hoyo en suelo arenoso a aproximadamente 1 metro de la orilla. El agua se filtrará por el agujero. Debe purificar el agua obtenida de esta manera.
Viajar
Con la práctica, el movimiento a través de la espesa maleza y la jungla se puede hacer de manera eficiente. Use siempre mangas largas para evitar cortes y rayones.
Para moverse con facilidad, debe desarrollar un «ojo de selva», es decir, no debe concentrarse en el patrón de arbustos y árboles en su frente inmediato. Debe concentrarte en la selva más alejada y encontrar cortes naturales en el follaje. Mire a través de la selva, no a ella. Deténgase y agáchese de vez en cuando para mirar a lo largo del suelo de la selva. Esta acción puede revelar los rastros de presa que puede seguir.
Manténgase alerta y muévase lenta y constantemente a través de un denso bosque o selva. Deténgase periódicamente para escuchar y orientarse. Use un machete para cortar la vegetación densa, pero no corte innecesariamente o se desgastará rápidamente. Si usa un machete, golpee hacia arriba cuando corte enredaderas para reducir el ruido porque el sonido llega a largas distancias en la selva. Use un palo para separar la vegetación. Usar un palo también ayudará a desalojar las hormigas, arañas o serpientes que pican. No se agarre a la maleza o enredaderas al subir pendientes; pueden tener espinas irritantes o espinas afiladas.
Muchos animales de la selva y del bosque siguen los senderos de la presa. Estos senderos serpentean y cruzan, pero con frecuencia conducen al agua o claros. Utilice estos senderos si conducen en la dirección de viaje deseada.
4b. Desierto
This section borrows heavily from the U.S. Army’s FM21-76 Survival manual, which is in the public domain.
Intense sunlight and heat increase the body’s need for water. To conserve your body fluids and energy, you will need a shelter to reduce your exposure to the heat of the day. Travel at night to lessen your use of water.
General Guidelines
Understanding how the air temperature and your physical activity affect your water requirements allows you to take measures to get the most from your water supply. These measures are–
- Find shade! Get out of the sun!
- Place something between you and the hot ground.
- Limit your movements!
- Conserve your sweat. Wear your complete uniform to include T-shirt. Roll the sleeves down, cover your head, and protect your neck with a scarf or similar item. These steps will protect your body from hot-blowing winds and the direct rays of the sun. Your clothing will absorb your sweat, keeping it against your skin so that you gain its full cooling effect. By staying in the shade quietly, fully clothed, not talking, keeping your mouth closed, and breathing through your nose, your water requirement for survival drops dramatically.
- If water is scarce, do not eat. Food requires water for digestion; therefore, eating food will use water that you need for cooling.
Thirst is not a reliable guide for your need for water. A person who uses thirst as a guide will drink only two-thirds of his daily water requirement. To prevent this “voluntary” dehydration, use the following guide:
- At temperatures below 38 degrees C, drink 0.5 liter of water every hour.
- At temperatures above 38 degrees C, drink 1 liter of water every hour.
Drinking water at regular intervals helps your body remain cool and decreases sweating. Even when your water supply is low, sipping water constantly will keep your body cooler and reduce water loss through sweating. Conserve your fluids by reducing activity during the heat of day. Do not ration your water! If you try to ration water, you stand a good chance of becoming a heat casualty.
Take extra care to avoid heat injuries. Rest during the day. Work during the cool evenings and nights. Use a buddy system to watch for heat injury, and observe the following guidelines:
- Make sure you tell someone where you are going and when you will return.
- Watch for signs of heat injury. If someone complains of tiredness or wanders away from the group, he may be a heat casualty.
- Drink water at least once an hour.
- Get in the shade when resting; do not lie directly on the ground.
- Do not take off your shirt and work during the day.
- Check the color of your urine. A light color means you are drinking enough water, a dark color means you need to drink more.
Getting Water
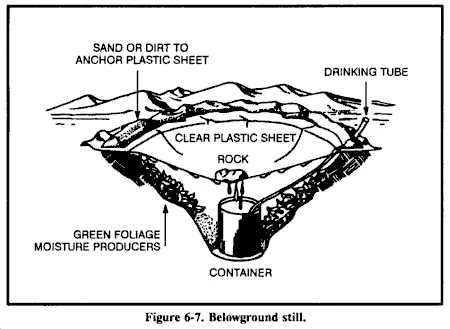
Below-ground still
To make a belowground still, you need a digging tool, a container, a clear plastic sheet, a drinking tube, and a rock.
Select a site where you believe the soil will contain moisture (such as a dry stream bed or a low spot where rainwater has collected). The soil at this site should be easy to dig, and sunlight must hit the site most of the day.
To construct the still–
- Dig a bowl-shaped hole about 1 meter across and 60 centimeters deep.
- Dig a sump in the center of the hole. The sump’s depth and perimeter will depend on the size of the container that you have to place in it. The bottom of the sump should allow the container to stand upright.
- Anchor the tubing to the container’s bottom by forming a loose overhand knot in the tubing.
- Place the container upright in the sump.
- Extend the unanchored end of the tubing up, over, and beyond the lip of the hole.
- Place the plastic sheet over the hole, covering its edges with soil to hold it in place.
- Place a rock in the center of the plastic sheet.
- Lower the plastic sheet into the hole until it is about 40 centimeters below ground level. It now forms an inverted cone with the rock at its apex. Make sure that the cone’s apex is directly over your container. Also make sure the plastic cone does not touch the sides of the hole because the earth will absorb the condensed water.
- Put more soil on the edges of the plastic to hold it securely in place and to prevent the loss of moisture.
- Plug the tube when not in use so that the moisture will not evaporate.
You can drink water without disturbing the still by using the tube as a straw.
You may want to use plants in the hole as a moisture source. If so, dig out additional soil from the sides of the hole to form a slope on which to place the plants. Then proceed as above.
If polluted water is your only moisture source, dig a small trough outside the hole about 25 centimeters from the still’s lip (Figure 6-8). Dig the trough about 25 centimeters deep and 8 centimeters wide. Pour the polluted water in the trough. Be sure you do not spill any polluted water around the rim of the hole where the plastic sheet touches the soil. The trough holds the polluted water and the soil filters it as the still draws it. The water then condenses on the plastic and drains into the container. This process works extremely well when your only water source is salt water.
You will need at least three stills to meet your individual daily water intake needs.
4c. Pantano
Saltwater Swamps
Saltwater swamps are common in coastal areas subject to tidal flooding. Mangrove trees thrive in these swamps. Mangrove trees can reach heights of 12 meters, and their tangled roots are an obstacle to movement. Visibility in this type of swamp is poor, and movement is extremely difficult. Sometimes, streams that you can raft form channels, but you usually must travel on foot through this swamp.
You find saltwater swamps in West Africa, Madagascar, Malaysia, the Pacific islands, Central and South America, and at the mouth of the Ganges River in India. The swamps at the mouths of the Orinoco and Amazon rivers and rivers of Guyana consist of mud and trees that offer little shade. Tides in saltwater swamps can vary as much as 12 meters.
Everything in a saltwater swamp may appear hostile to you, from leeches and insects to crocodiles and caimans. Avoid the dangerous animals in this swamp.
Avoid this swamp altogether if you can. If there are water channels through it, you may be able to use a raft to escape.
Freshwater Swamps
You find freshwater swamps in low-lying inland areas. Their characteristics are masses of thorny undergrowth, reeds, grasses, and occasional short palms that reduce visibility and make travel difficult. There are often islands that dot these swamps, allowing you to get out of the water. Wildlife is abundant in these swamps.
Swamp Bed
In a marsh or swamp, or any area with standing water or continually wet ground, the swamp bed keeps you out of the water. When selecting such a site, consider the weather, wind, tides, and available materials.
To make a swamp bed–
- Look for four trees clustered in a rectangle, or cut four poles (bamboo is ideal) and drive them firmly into the ground so they form a rectangle. They should be far enough apart and strong enough to support your height and weight, to include equipment.
- Cut two poles that span the width of the rectangle. They, too, must be strong enough to support your weight.
- Secure these two poles to the trees (or poles). Be sure they are high enough above the ground or water to allow for tides and high water.
- Cut additional poles that span the rectangle’s length. Lay them across the two side poles, and secure them.
- Cover the top of the bed frame with broad leaves or grass to form a soft sleeping surface.
- Build a fire pad by laying clay, silt, or mud on one comer of the swamp bed and allow it to dry.
Another shelter designed to get you above and out of the water or wet ground uses the same rectangular configuration as the swamp bed. You very simply lay sticks and branches lengthwise on the inside of the trees (or poles) until there is enough material to raise the sleeping surface above the water level.
4d. Montaña (rocas, hielo, altitud elevada)
Falling rocks
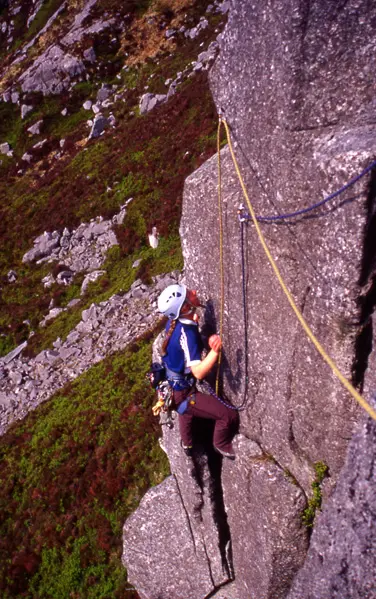
Rocky mountains tend to be hazardous.
Every rock mountain is slowly disintegrating due to erosion, the process being especially rapid above the snow-line. Rock faces are constantly swept by falling stones, which may be possible to dodge. Falling rocks tend to form furrows in a mountain face, and these furrows (couloirs) have to be ascended with caution, their sides often being safe when the middle is stoneswept. Rocks fall more frequently on some days than on others, according to the recent weather. Ice formed during the night may temporarily bind rocks to the face but warmth of the day or lubricating water from melting snow or rain may easily dislodge these rocks. Local experience is a valuable help on determining typical rockfall on such routes.
The direction of the dip of rock strata sometimes determines the degree of danger on a particular face; the character of the rock must also be considered. Where stones fall frequently debris will be found below, while on snow slopes falling stones cut furrows visible from a great distance. In planning an ascent of a new peak or an unfamiliar route, mountaineers must look for such traces. When falling stones get mixed in considerable quantity with slushy snow or water a mud avalanche is formed (common in the Himalaya). It is vital to avoid camping in their possible line of fall.
Falling ice
The places where ice may fall can always be determined beforehand. It falls in the broken parts of glaciers (seracs) and from overhanging cornices formed on the crests of narrow ridges. Large icicles are often formed on steep rock faces, and these fall frequently in fine weather following cold and stormy days. They have to be avoided like falling stones. Seracs are slow in formation, and slow in arriving (by glacier motion) at a condition of unstable equilibrium. They generally fall in or just after the hottest part of the day. A skillful and experienced ice-man will usually devise a safe route through a most intricate ice-fall, but such places should be avoided in the afternoon of a hot day. Hanging glaciers (i.e. glaciers perched on steep slopes) often discharge themselves over steep rock-faces, the snout breaking off at intervals. They can always be detected by their debris below. Their track should be avoided.
Falls from rocks
The skill of a rock climber is shown by one’s choice of handhold and foothold, and their adhesion to those once they have chosen. Much depends on a correct estimate of the firmness of the rock where weight is to be thrown upon it. Many loose rocks are quite firm enough to bear a person’s weight, but experience is needed to know which can be trusted, and skill is required in transferring the weight to them without jerking. On rotten rocks the rope must be handled with special care, lest it should dislodge loose stones on to those below. Similar care must be given to handholds and footholds, for the same reason. When a horizontal traverse has to be made across very difficult rocks, a dangerous situation may arise unless at both ends of the traverse there are firm positions. Mutual assistance on hard rocks takes all manner of forms: two, or even three, people climbing on one another’s shoulders, or using an ice axe propped up by others for a foothold. The great principle is that of co-operation, all the members of the party climbing with reference to the others, and not as independent units; each when moving must know what the climber in front and the one behind are doing. After bad weather steep rocks are often found covered with a veneer of ice (verglas), which may even render them inaccessible. Crampons are useful on such occasions.
Avalanches
The avalanche is the most underestimated danger in the mountains. People generally think that they will be able to recognize the hazards and survive being caught. The truth is a somewhat different story. Every year, 120 - 150 people die in small avalanches in the Alps alone. The vast majority are reasonably experienced male skiers aged 20–35 but also include ski instructors and guides. There is always a lot of pressure to risk a snow crossing. Turning back takes a lot of extra time and effort, supreme leadership, and most importantly there seldom is an avalanche to prove the right decision was made. Making the decision to turn around is especially hard if others are crossing the slope, but the next person could become the trigger.
Dangerous slides are most likely to occur on the same slopes preferred by many skiers: long and wide open, few trees or large rocks, 30 to 45 degrees of angle, large load of fresh snow, soon after a big storm, on a slope ‘lee to the storm’. Solar radiation can trigger slides as well. These will typically be a point release or wet slough type of avalanche. The added weight of the wet slide can trigger a slab avalanche. Ninety percent of reported victims are caught in avalanches triggered by themselves or others in their group.
When going off-piste or travelling in alpine terrain, parties are advised to always carry:
- avalanche beacon
- probe
- shovel (retrieving victims with a shovel instead of your hands is five times faster)
It is also important to have had avalanche training! Paradoxically, expert skiers who have avalanche training make up a large percentage of avalanche fatalities; perhaps because they are the ones more likely to ski in areas prone to avalanches, and certainly because most people do not practice enough with their equipment to be truly fast and efficient rescuers.
Even with proper rescue equipment and training, there is a one-in-five chance of dying if caught in a significant avalanche, and only a 50/50 chance of being found alive if buried more than a few minutes. The best solution is to learn how to avoid risky conditions.
Ice slopes
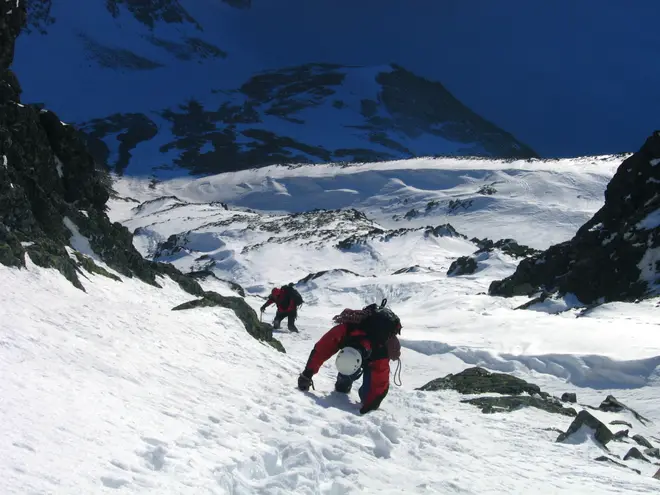
Mountaineers descending mixed rock, snow and ice slope in winter High Tatras.
For travel on slopes consisting of ice or hard snow, crampons are a standard part of a mountaineer’s equipment. While step-cutting can sometimes be used on snow slopes of moderate angle, this can be a slow and tiring process, which does not provide the higher security of crampons. However, in soft snow or powder, crampons are easily hampered by balling of snow, which reduces their effectiveness. In either case, an ice axe not only assists with balance but provides the climber with the possibility of self-arrest in case of a slip or fall. On a true ice slope however, an ice axe is rarely able to effect a self-arrest. As an additional safety precaution on steep ice slopes, the climbing rope is attached to ice screws buried into the ice.
True ice slopes are rare in Europe, though common in mountains in the tropics, where newly-fallen snow quickly thaws on the surface and becomes sodden below, so that the next night’s frost turns the whole mass into a sheet of semi-solid ice.
Snow slopes
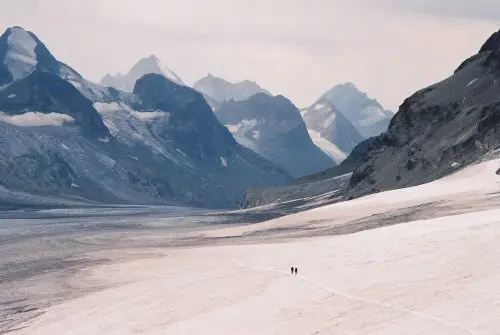
Part of the Haute Route between France and Switzerland; two alpinists can be seen following the trail in the snow.
Snow slopes are very common, and usually easy to ascend. At the foot of a snow or ice slope is generally a big crevasse, called a bergschrund, where the final slope of the mountain rises from a snow-field or glacier. Such bergschrunds are generally too wide to be stepped across, and must be crossed by a snow bridge, which needs careful testing and a painstaking use of the rope. A steep snow slope in bad condition may be dangerous, as the whole body of snow may start as an avalanche. Such slopes are less dangerous if ascended directly, rather than obliquely, for an oblique or horizontal track cuts them across and facilitates movement of the mass. New snow lying on ice is especially dangerous. Experience is needed for deciding on the advisability of advancing over snow in doubtful condition. Snow on rocks is usually rotten unless it is thick; snow on snow is likely to be sound. A day or two of fine weather will usually bring new snow into sound condition. Snow cannot lie at a very steep angle, though it often deceives the eye as to its slope. Snow slopes seldom exceed 40°. Ice slopes may be much steeper. Snow slopes in early morning are usually hard and safe, but the same in the afternoon are quite soft and possibly dangerous; hence the advantage of an early start.
Crevasses
Crevasses are the slits or deep chasms formed in the substance of a glacier as it passes over an uneven bed. They may be open or hidden. In the lower part of a glacier the crevasses are open. Above the snow-line they are frequently hidden by arched-over accumulations of winter snow. The detection of hidden crevasses requires care and experience. After a fresh fall of snow they can only be detected by sounding with the pole of the ice axe, or by looking to right and left where the open extension of a partially hidden crevasse may be obvious. The safeguard against accident is the rope, and no one should ever cross a snow-covered glacier unless roped to one, or even better to two companions. Anyone venturing onto crevasses should be trained in crevasse rescue.
Weather
The primary dangers caused by bad weather centre around the changes it causes in snow and rock conditions, making movement suddenly much more arduous and hazardous than under normal circumstances. Whiteouts make it difficult to retrace a route while rain may prevent taking the easiest line only determined as such under dry conditions. In a storm the mountaineer who uses a compass for guidance has a great advantage over a merely empirical observer. In large snow-fields it is, of course, easier to go wrong than on rocks, but intelligence and experience are the best guides in safely navigating objective hazards.
Summer thunderstorms may produce intense lightning. If a climber happens to be standing on or near the summit, they risk being struck. There are many cases where people have been struck by lightning while climbing mountains. In most mountainous regions, local storms develop by late morning and early afternoon. Many climbers will get an “alpine start”; that is before or by first light so as to be on the way down when storms are intensifying in activity and lightning and other weather hazards are a distinct threat to safety. High winds can speed the onset of hypothermia, as well as damage equipment such as tents used for shelter. Under certain conditions, storms can also create waterfalls which can slow or stop climbing progress. A notable example is the “Foen” wind acting upon the Eiger.
Altitude
Rapid ascent can lead to altitude sickness. The best treatment is to descend immediately. The climber’s motto at high altitude is “climb high, sleep low”, referring to the regimen of climbing higher to acclimatize but returning to lower elevation to sleep.
Common symptoms of altitude sickness include severe headache, sleep problems, nausea, lack of appetite, lethargy and body ache. Mountain sickness may progress to HACE (High Altitude Cerebral Edema) and HAPE (High Altitude Pulmonary Edema), both of which can be fatal within 24 hours.
In high mountains, atmospheric pressure is lower and this means that less oxygen is available to breathe. This is the underlying cause of altitude sickness. Everyone needs to acclimatize, even exceptional mountaineers that have been to high altitude before. Generally speaking, mountaineers start using bottled oxygen when they climb above 7,000 m. Exceptional mountaineers have climbed 8000-meter peaks (including Everest) without oxygen, almost always with a carefully planned program of acclimatization.
4e. Llanura y tundra
4f. Bosque templado
Fire
Small fires are better than large ones as they require less fuel and make less smoke. Sit close. Less fuel means less work in gathering fuel. Review the answers in Camping Skills IV to refresh yourself on how to build a fire in wet weather.
Water
When travelling for extended periods of time in the wilderness, it is not practical to carry all the water you will need. Happily, it is not necessary to do that either if you know how to make the water that is available suitable for drinking. There are generally three ways to purify water: chemically, by boiling, or by filtering. The most reliable method of purifying water is by pumping it through a filter. Chemically treating the water is also easy and convenient until you run out of purification tablets. Boiling water requires that you stop long enough to build a fire and bring the water to a boil. Then you are faced with the problem of carrying boiling water. For these reasons, filtering is the preferred solution. Be sure to refill when water is available, and think ahead to when water may not be plentiful (such as near the summit of a large hill or mountain), and make adequate preparations.
Bear Danger
Bear danger is the risk encountered by humans while interacting with wild bears.
Although some bears are alpha predators in their own habitat, they do not, under normal circumstances, hunt and feed on animals of their own size (including humans). Therefore, the most important cases of bear attack occur when the animal is defending itself against any possible threat. For instance, bear sows can become extremely aggressive if they feel their cubs are threatened. Any solitary bear is also likely to become agitated if surprised or cornered by a threat maker, especially while eating.
Dealing with bear encounters
Before backpackers are allowed to enter an area with bears, they may be required to watch a video that teaches how to avoid encountering or agitating bears. Experts emphasize keeping your distance and making noise to avoid startling a bear as the best ways to avoid a bear attack. If a bear does become confrontational, the usual advice is to raise the arms above the head so as to appear larger, and to yell at the bear. Running away can activate the bear’s hunting instincts and lead to it perceiving the human as prey. If a bear does charge, persons are advised to hold their ground, as most bear charges are bluffs. Finally, if a bear does attack, the usual advice is to curl into a fetal position so as to shield vital organs and appear non-threatening. If this is not effective in stopping the attack, the only option left is to fight the bear in any way you can. The ideal place to punch a bear is the snout or eyes. This advice applies to omnivores such as brown and black bears; the best way to avoid being attacked by the completely carnivorous polar bear is not to enter any area where polar bears live, or at least remain inside a hard-shell vehicle or building.
Food storage and garbage disposal
Bears have an excellent sense of smell, and are attracted to human and pet foods as well as refuse. Improper storage of these items can allow bears to eat human food and become dependent on it, increasing the probability of encounters with humans. Most brown and black bear encounters in human-populated areas involve so-called “trouble bears”, usually young males who have just left their mothers and do not yet have a territory of their own. If they wander close to human settlements, the smells of cooking and garbage can cause them to ignore their usual instinct to avoid humans. Many parks and persons in areas with bears utilize bear-resistant garbage cans and dumpsters for this reason, and many areas have laws prohibiting the feeding of bears, even if unintentional. Campers can access bear-proof containers from many parks to store their food and trash. The containers are then buried or strung on a rope between two tall trees, out of bears’ reach. They are also instructed to put their containers, campfire, and tenting 90 meters  away from each other, forming a triangle.
5. Demostrar la construcción y operación de dos tipos de trampas o trampillas.
6. Conocer los puntos a considerar en las siguientes clases de viajes:
6a. Glacial
6b. Montaña
6c. Nieve
6d. Agua
Viajar por agua significa viajar por medio de algún tipo de bote, ya sea un velero, lancha motora, bote de remos, canoa o kayak. En todos los casos, es importante que todas las personas tengan acceso a un chaleco salvavidas. Consulte las respuestas a las siguientes especialidades para obtener más información:
7. Comprender los principios del desarrollo de la fe en el liderazgo divino como se indica en el Salmo 91.
8. Entender qué medidas deben tomarse para la supervivencia en la vida silvestre/desértica.
9. Ayudar a enseñar una especialidad enumerada en el requisito 1 de la especialidad de Liderazgo en la naturaleza.
- Campamento I
- Campamento II
- Campamento III
- Campamento IV
- Excursionismo
- Fogatas y cocina al aire libre
- Orientación
- Primeros auxilios II
- Senderismo
10. Construir un refugio de materiales naturales sin vida (tales como una choza de los desechos).
11. Planificar y participar en la experiencia en una semana de campamento de vida primitiva, aplicando los principios y las habilidades aprendidas en esta especialidad.
Aquí es donde todo ese conocimiento se usa. El campamento en la naturaleza es diferente del campamento con instalaciones y ofrece al Conquistador muchas oportunidades para practicar la dinámica de grupo, la responsabilidad y la confianza en sí mismo. Un viaje bien organizado es una alegría de experimentar, mientras que uno mal organizado puede ser una serie aparentemente interminable de contratiempos y desgracias.
Como líder, es importante que no haga todo. Los otros participantes sentirán que son simplemente equipaje y comenzarán a actuar como si no tuvieran responsabilidades. Al «hacer» en lugar de «liderar», es demasiado fácil quedar absorto en la tarea en cuestión y perder la visión general. Mientras está ocupado haciendo, otras personas terminan (o abandonan) sus tareas, y usted está demasiado ocupado para darles su próxima tarea. Más bien, usted, como líder, debería «dirigir» las actividades de los demás. Sepa qué debe hacerse a continuación y asigne a alguien que lo haga. Si tienen problemas, ayúdelos, pero no se haga cargo. Si al ayudarles se involucra demasiado, asigna a alguien más para que les ayude.
Una forma altamente efectiva de hacer esto es hacer un conjunto de tarjetas que describan cada tarea que se debe hacer al levantar (o desarmar) el campamento. Cada tarea debe ser realizada por un equipo de tres o cuatro niños con el asesoramiento y la orientación de un mentor adulto. Ordene las tareas en grupos por prioridad, de modo que las cosas que se deben hacer primero estén en un grupo, las cosas que se deben hacer en segundo lugar, y las cosas que se deben hacer en último lugar en el tercer grupo. Etiquete estos grupos A, B y C. La cantidad de tareas en cada grupo debe ser igual a la cantidad de equipos de 3 a 5 personas que estarán acampando con usted. No incluya armar las tiendas para dormir en esta lista de tareas.
Cada tarjeta también debe estar marcada con puntos que se otorgarán al equipo que complete esa tarea. Las tareas difíciles, largas o desagradables deben valer muchos puntos. A las tareas fáciles, rápidas y divertidas se les debe otorgar algunos puntos.
Antes de partir para su viaje, reúna a los niños en equipos y asigne a cada equipo un mentor adulto. Cada equipo debe tener una mezcla de niños: algunos que tengan experiencia o habilidades, y otros que no tengan experiencia o que aún no hayan desarrollado habilidades para acampar.
Elige a los equipos sabiamente.
Asigne los más jóvenes a adolescentes y asigne adolescentes a mentores adultos. Repase esto con los adolescentes antes de tiempo para que tengan una idea de lo que deben enseñar a los jóvenes menores a hacerlo «como ellos lo hacen». Esto no sólo introducirá a los jóvenes a nuevos conocimientos, sino que también lo reforzará con sus adolescentes.
Cuando llegue a su lugar de campamento, pida a todos los Conquistadores que armen las tiendas en las que dormirán y luego guarden sus sacos de dormir y equipo personal en ellas. Cuando hayan terminado con eso, haga que se junten cerca del equipo restante. Tan pronto como un equipo completo haya terminado de armar sus tiendas y de guardar su equipo, puede elegir una de las tareas. Cuando terminan su tarea A a satisfacción de su mentor, pueden elegir una tarea B. Cuando terminan su tarea B, pueden elegir una tarea C. Cuando terminan su tarea de C, pueden elegir otra tarea de C si hay una disponible (y así mejorar su total de puntos).
Asegúrese de informar a sus Conquistadores cómo se usarán los puntos con anticipación; de lo contrario no servirán como un incentivo efectivo. Podría otorgarle al equipo el mayor número de puntos el privilegio de ser despedido para comer primero, seguido por el equipo con el segundo número más alto de puntos, etc. Consuele al equipo con el menor número de puntos recordándoles que el personal realmente come de último.
Referencias
¿Encontraste un error? Repórtalo.